DAGeVu Modeller — User Guide
Work in progress. The DAGeVu modeller is an early, spine-proven authoring surface — this guide is deliberately a short intro plus an index of the toolbar icons. Expect it to grow as the modeller does.
What it is
DAGeVu is a browser BIM authoring surface that sits beside the read-only viewer. Instead of editing a file, you apply operations — insert a component, sketch a profile, extrude, sweep, fillet — and the model is a deterministic fold of that signed operation log. The op-log is the feature tree: every action is recorded, replayable, and reversible, and the same signed-log idea drives the Kernel-ERP engine.
Open it: red1oon.github.io/bim-ootb/viewer/modeller.html (desktop — the B-rep kernel is heavy). The Home button returns to the Matrix landing.
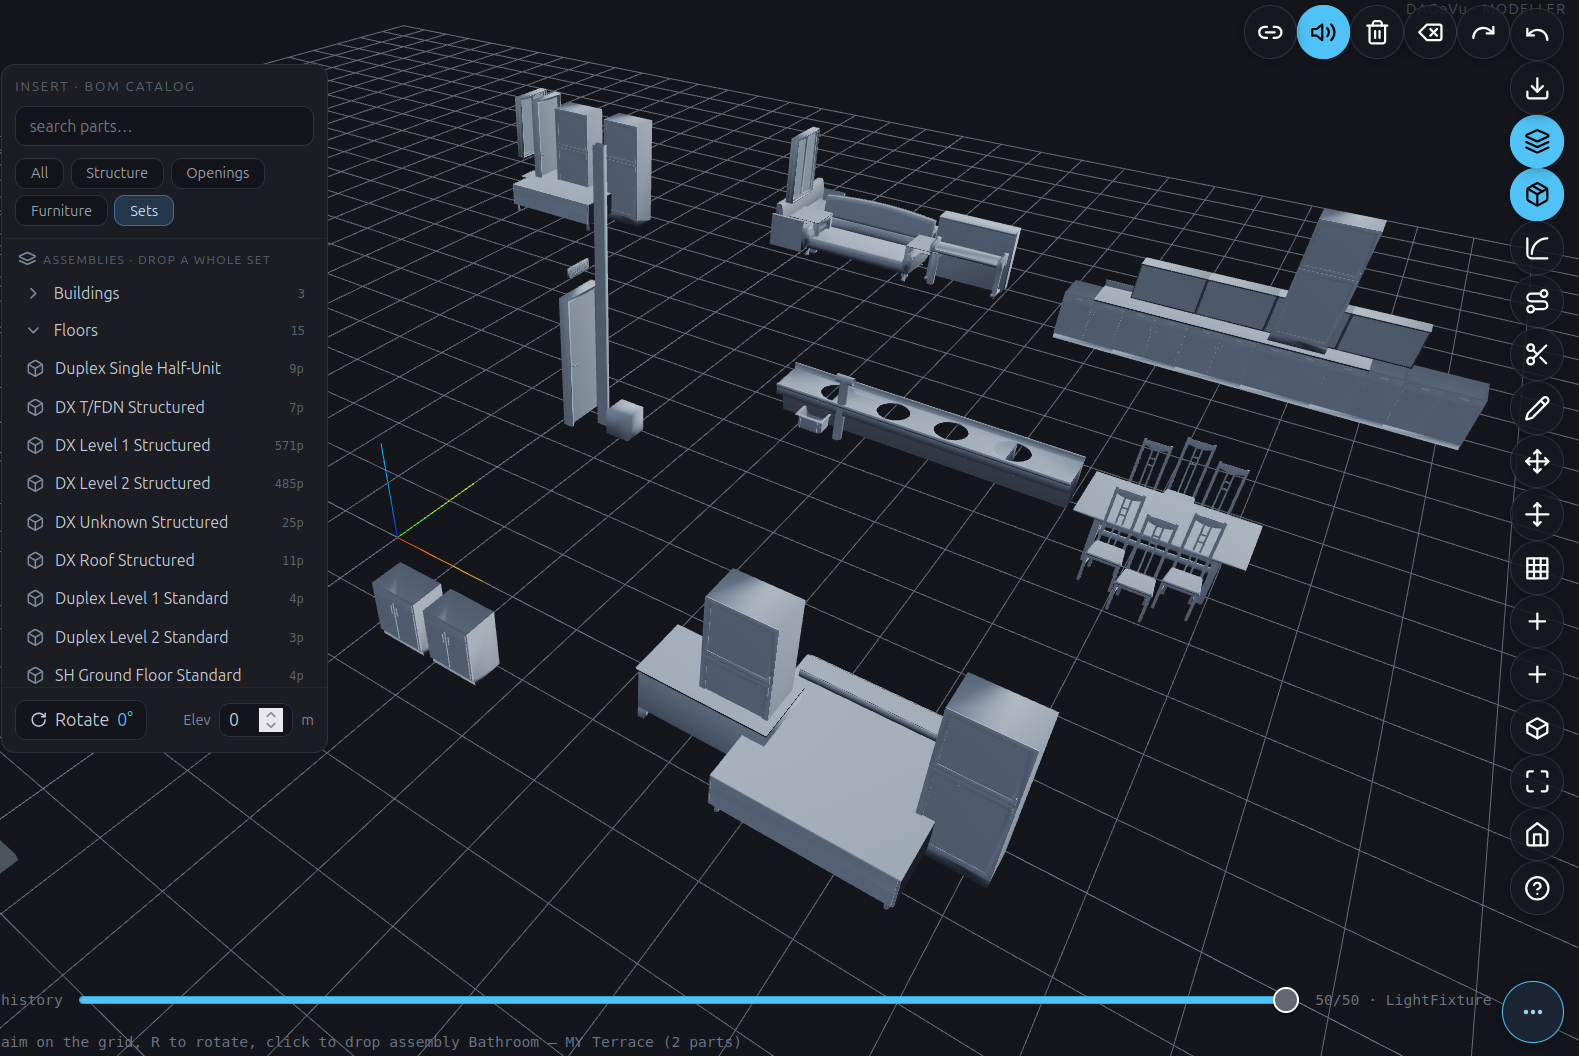
Your first insert — the BOM catalog
The fastest way to build is to assemble, not draw. Tap the Insert tool (the cube icon in the toolbar — open the ⋯ pill rail at the bottom‑right if the pills are collapsed) to open the INSERT · BOM CATALOG panel on the left:
- Find a component. Type in search parts…, or narrow with the filter chips —
All · Structure · Openings · Furniture · Sets. The catalog is extracted from the real
component library (
component_library.dbplus the per-building BOMs), so what you see are actual parts and pre-built assemblies. - Pick a part — or a whole set. Single parts drop one element. Sets are assemblies (whole BOM sets) grouped by level — Buildings · Floors · Rooms · Sets · Items — each collapsible, with a part-count badge (e.g. Duplex Single Half-Unit, DX Level 1 Structured). Pick one to drop the entire recipe at once.
- Aim and place. The status line prompts "aim on the grid, R to rotate, click to place". Move the cursor over the grid to position the ghost preview; press R to rotate (the Rotate angle in the panel footer updates); set Elev (metres) to lift it to a storey height; then click to drop it.
- It's a signed op. The placement lands as one operation in the op-log — visible on the history
scrubber at the bottom and fully undoable (
Ctrl+Z). An assembly drops as a single grouped op of N parts, each seated and oriented from the recipe — e.g. doors and windows take their host wall's facing automatically, rotating with the wall rather than landing flat.
From there, use the toolbar pills to refine: move/rotate a placed object, sketch and extrude new geometry, cut, sweep an MEP run, or bump a component's level of detail. The Outliner panel (left) lists the placed elements; collapse it with its chevron to free up the canvas.
The toolbar — icon index
The toolbar is a ⋯ pill rail at the bottom-right: tap ⋯ to fan the icon-only glass pills up,
and hover any pill for its name. The ? Help pill opens the TOOLBAR · PILL REGISTRY — the live
list of every tool's icon, name, and keyboard shortcut (Esc always cancels the current mode).
| Icon | Does |
|---|---|
| ⋯ Toolbar | Fan the toolbar pills open / closed (bottom-right) |
| ? Help | Toolbar & shortcuts — the live pill registry |
| Home | Back to the Matrix landing |
| Fit | Zoom to fit — frames the selection, or the whole scene (F) |
| Iso | Cycle the view: Iso ⇄ Top |
| Wall | Draw a wall |
| Opening | Place an opening (door / window) in a wall |
| Grid | Show / add a construction grid |
| Move Grid | Drag a gridline — attached walls recompose with it |
| Move | Move the selected object — drag an axis handle or nudge with the arrow keys (M) |
| Sketch | Start a 2D sketch |
| Extrude | Push a sketch profile into a solid |
| Axis | Set the constraint intent the solver enforces on the sketch |
| Cut | Boolean-cut one solid with another |
| Route | Define a route to sweep a profile along (e.g. an MEP run) |
| Sweep Run | Sweep the profile along the route |
| Fillet | Round a selected solid's picked edges |
| Apply | Commit the pending fillet / chamfer |
| Insert | Insert a library component — assemble, don't draw (catalog + BOM-assembly drop) |
| LOD 200 | Refine the selected component's level of detail (same signed row) |
| IFC | Export the authored model as IFC4 |
| Undo | Undo the last operation (Ctrl+Z) |
| Redo | Redo (Ctrl+Shift+Z) |
| Delete | Delete the selection (Del) |
| Clear | Empty the scene |
| Sound | Toggle authoring sound feedback |
| Connect | Connect Scene — share selection / timeline with the Viewer & ERP (opt-in; surfaces stay separate) |
Part of BIM OOTB. Copyright (c) 2025–2026 Redhuan D. Oon. MIT Licensed.