BIM OOTB — Browser Viewer User Guide¶
← Back to the User Guide · Home
See also: Clash Detection · 4D/5D Analysis
Quick Start — your first building¶
Zero install. Everything runs client-side in any browser; download a building once and it is cached in IndexedDB, so the second visit is instant. Works on desktop and mobile.
You enter through the Matrix front door (index.html) — not viewer/viewer.html directly (that
bare URL opens an unrelated warehouse view). On the front door choose the Buildings / IFC door and
the BUILDINGS & IFC hub opens:
→ Front door (index.html) → choose Buildings / IFC
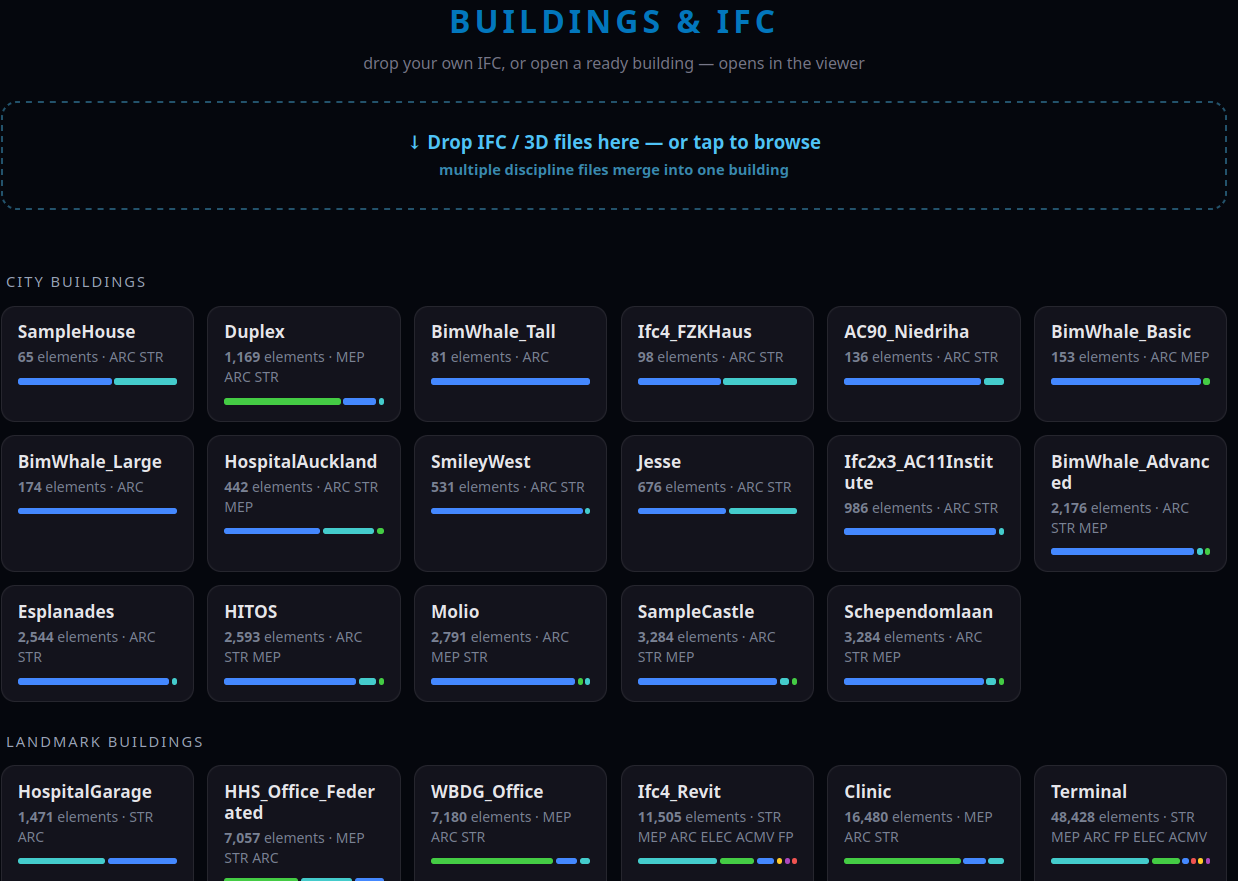
Three ways in — pick one:
- Open a ready-made building. Tap a card under City Buildings or Landmark Buildings (SampleHouse, Duplex, Clinic, Terminal, Hospital, …). It downloads that building's DB (0.5–177 MB), flies to it, and streams the geometry in the 3D viewer.
- Drop your own IFC. Drag an
.ifc/.obj/.dae/.glbfile onto the centre "Drop IFC / 3D files here" zone (or tap it to browse). The file is parsed in-browser and opens in the viewer. - Add to an existing project. When you drop a file that matches a building already loaded, a
prompt offers Merge (combine disciplines —
Enter) or New (a fresh building —Escape); two versions of the same building can be opened side-by-side with Compare Versions.
Once the viewer opens:
- Watch the progress bar and element flicker as geometry streams in.
- Click any element → the Info panel shows its IFC class, name, GUID, storey, discipline, material.
- Filter by storey or discipline (bottom-left panels) to isolate part of the model.
- Alt+Z for X-Ray, ☆ for white background, ✈ to fly around, 📷 for a screenshot.
- Open another building → the first pauses; tap back to resume.
Full navigation, panels, and the keyboard cheat-sheet are below.
Run it on your own machine¶
Local setup (3 steps):
# 1. Go to deploy folder
cd deploy

# 2. Start local server
python3 -m http.server 8080

# 3. Open the front door in your browser, then choose Buildings / IFC
# http://localhost:8080/index.html
Per-building DBs must be in deploy/buildings/:
- {Name}_extracted.db — metadata + transforms
- {Name}_library.db — geometry BLOBs (vertices + faces)
Then open http://localhost:8080/index.html, choose Buildings / IFC, and use the same three ways in as above.
DB sizes:
| Building | Elements | Download (ext+lib) |
|---|---|---|
| SampleHouse | 65 | 0.5 MB |
| Duplex | 1,169 | 2.8 MB |
| Clinic | 16,480 | 31 MB |
| Terminal | 48,428 | 59 MB |
| Hospital | 63,917 | 88 MB |
| LTU AHouse | 125,698 | 177 MB |
3D Navigation¶
| Input | Action |
|---|---|
| Drag | Orbit camera |
| Shift + Drag | Pan camera |
| Right-click drag | Pan camera |
| Scroll / Pinch | Zoom |
| Click element | Identify — shows IFC class, name, GUID, storey, material |
| Alt+Z | X-Ray toggle (15% opacity) |
| F11 | Fullscreen toggle |
Toolbar buttons (top-right panel):
| Button | Action |
|---|---|
| Clear | Remove all streamed meshes |
| X-Ray | Toggle 15% transparency on all elements |
| 📷 | Screenshot (saves PNG to Downloads/) |
| ⛶ | Fullscreen |
| ☆ / ☾ | Light/dark theme |
| ✈ | Fly around rendered buildings |
Panels:
| Panel | Position | Shows |
|---|---|---|
| BIM OOTB | Top-left | Buildings, streaming progress, element flicker |
| Tools | Top-right | Filter, buttons, building list |
| Info | Bottom-right | Clicked element metadata (class, GUID, storey, disc, material) |
| Storeys | Bottom-left | Floor filter — click to isolate one storey |
| Disciplines | Bottom-left | Discipline toggle — show/hide ARC, STR, MEP etc. |
| Status | Bottom-centre | Current streaming state |
All panels collapse with −/+.
Viewer Features¶
All browsers (desktop + mobile):
- 3D orbit, pan, zoom (mouse or touch)
- Click any element → IFC class, GUID, storey, discipline, material
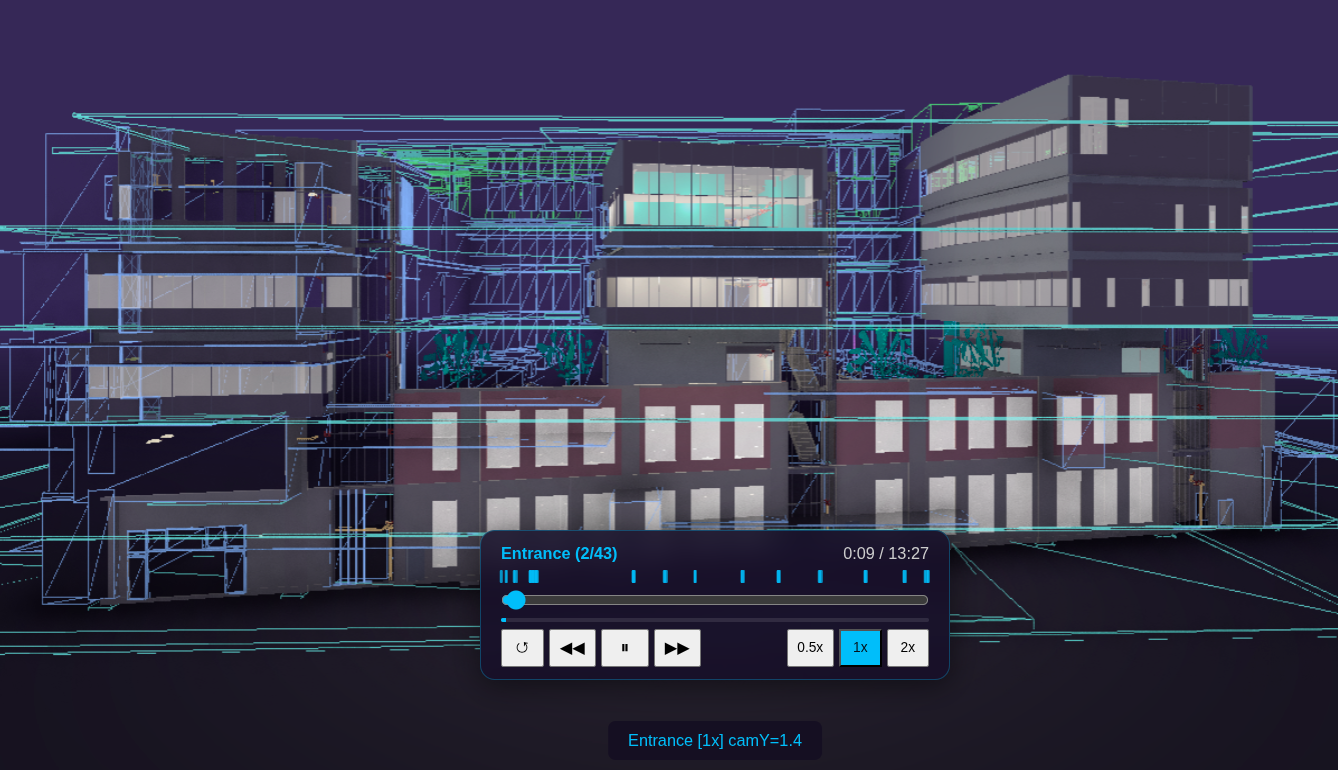
- Fly-tour — plays a routed flight through the building (entrance → highlight room → storey-by-storey);
drag the scrub bar to seek anywhere in the tour,
◀◀/▶▶to step beat-by-beat,0.5x/1x/2xspeed, pause/resume and loop — every position is deterministic (same timestamp always gives the same camera pose), so scrubbing back and forth never drifts
 - Film-Maker (Alt+C) — derives a complete cinematic film of the building from its own room graph,
then lets you edit the flight by dragging the flight itself, and records it to an mp4 in the browser.
See Cinema Film-Maker below
- Indoor walk-through — follows IfcSpace/door graph through the building
- X-Ray mode (Alt+Z) — a 3-state cycle: Off → X-Ray → Bounding Boxes → Off. X-Ray is the transparent
see-through-walls view; Bounding Boxes swaps that for each element's envelope box instead — press again to cycle
- Measure tool — tap two points, get distance in metres
- Section cut — horizontal clip plane, slider to cut through floors
- Storey filter — isolate a single floor
- Discipline toggle — show/hide ARC, STR, MEP, ELEC, etc.
- Screenshot — saves current view as PNG
- Deep-link URL — camera + building state encoded in hash, shareable
- IndexedDB cache — download once, instant on revisit
- City mode — 786 building bboxes, click to download + stream on demand
- Film-Maker (Alt+C) — derives a complete cinematic film of the building from its own room graph,
then lets you edit the flight by dragging the flight itself, and records it to an mp4 in the browser.
See Cinema Film-Maker below
- Indoor walk-through — follows IfcSpace/door graph through the building
- X-Ray mode (Alt+Z) — a 3-state cycle: Off → X-Ray → Bounding Boxes → Off. X-Ray is the transparent
see-through-walls view; Bounding Boxes swaps that for each element's envelope box instead — press again to cycle
- Measure tool — tap two points, get distance in metres
- Section cut — horizontal clip plane, slider to cut through floors
- Storey filter — isolate a single floor
- Discipline toggle — show/hide ARC, STR, MEP, ELEC, etc.
- Screenshot — saves current view as PNG
- Deep-link URL — camera + building state encoded in hash, shareable
- IndexedDB cache — download once, instant on revisit
- City mode — 786 building bboxes, click to download + stream on demand
Find panel — search, voice query, and axis lenses¶
The Find panel is the Viewer's search/navigate surface: a text or voice query box up top, and a single axis toggle underneath that re-groups the whole element tree (by storey, discipline, room, material, phase, or the newest axis, building Parts).
How to open it (with a building already loaded — see Quick Start):
- On the right edge of the screen, find the toolbar rail (desktop) or the scrollable pill strip
(mobile) — tap the ··· button if the rail isn't already showing. Find the Navigate icon
(a sailboat glyph) among the rail's icons.

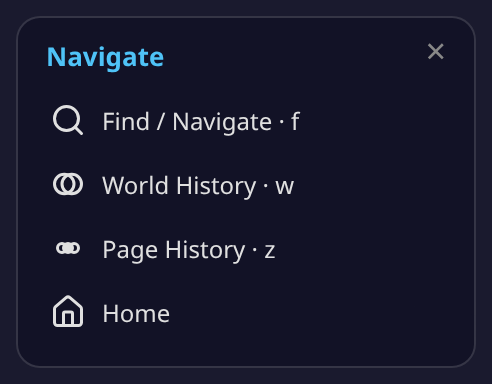
- Tap Navigate. The Navigate drawer opens, listing Find / Navigate, World History,
Page History, and Home (a fifth row, Walk, is mobile-only and won't appear on desktop).
Tap the Find / Navigate row (magnifying-glass icon, shortcut F).
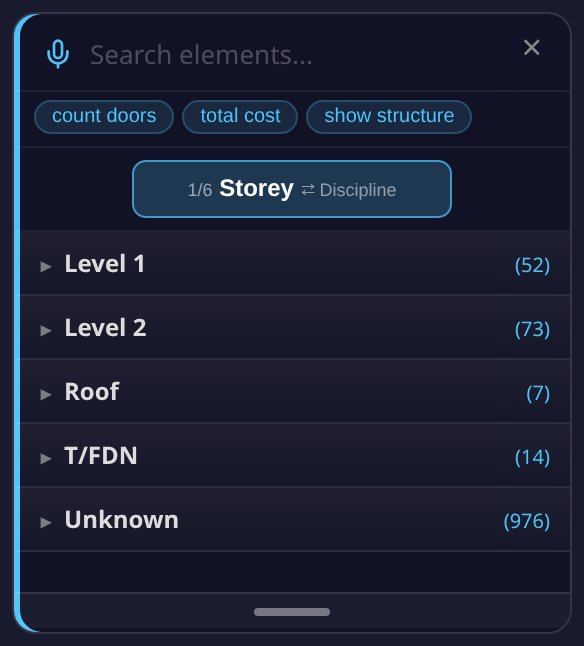
- The Find panel opens on the right side of the screen, with the search bar focused and ready to
type. On desktop you can also press F to open it directly, from anywhere in the viewer.
- Tap the × in the top corner of the panel, or press F again, to close it.
The search / query box. The input (placeholder "Search elements…") does two different things depending on what you type:
- Plain text (e.g. a product name, or an IFC class like "door") filters the element tree live as you type — a normal name/class search.
- A natural-language query — anything starting with a recognized verb (
count,how many,number of,total,cost,show,list,what,find,search) is detected as you type. Recognized phrases don't filter the tree live like a plain search does — type the phrase, then press Enter to run it. Recognized query shapes include: count doors/how many beams/number of windows— element count by IFC class.total cost— an indicative 5D cost breakdown by IFC class, using the active rate pack.cost of <discipline or class>— cost narrowed to one discipline (e.g. "cost of electrical") or class.total area/total length/total volume[of <class>] — element count as a proxy quantity (the loaded DB does not carry IFC quantity-takeoff dimensions, so this is a count, not a measured area/length/volume).floor area— a slab count (same caveat: no measured floor-area dimension in the DB).show <discipline>/list <discipline>— every element in that discipline, grouped by class.what disciplines— every discipline present in the building, with element counts.find <term>/search <term>— routes back into this same Find panel as a plain search for<term>.floor <n> <class>/ground floor <class>— a storey-scoped count (e.g. "floor 2 beams").- A more general typed-language decoder is tried first and understands a broader range of phrasing; the patterns above are the documented fallback when that decoder doesn't recognize the phrase.
- Three example chips below the box — count doors, total cost, show structure — run a
query immediately when tapped, no typing required.
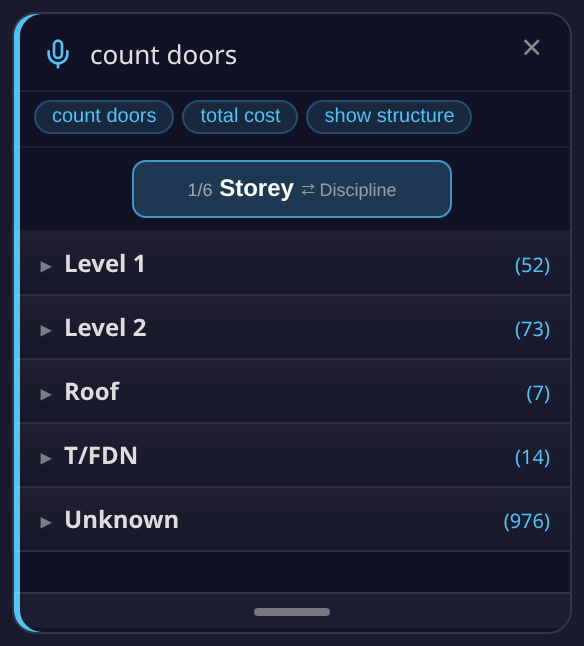
- Voice search — tap the microphone icon to the left of the text box and speak a query using the same phrasing as above (e.g. "count doors"). The recognized text fills the box live while you speak (shown in italics until finalized), and the finished phrase runs automatically — no need to press Enter.
The axis toggle. Below the search bar, one button shows the current axis and how many are available (e.g. "1/6 Storey" on a building where all six axes are present) — tap it to cycle to the next axis. Two axes are always present; up to four more appear only when the loaded building actually has that kind of data (no data, no empty axis):
| Axis | Always shown? | What it shows |
|---|---|---|
| Storey | Always | Elements grouped by building level/storey. Expand a storey to see the rooms/spaces on it (or, if the building has no room data, its most common IFC classes). Tapping a storey or room isolates it in the 3D view. |
| Discipline | Always | Elements grouped by discipline (ARC/STR/MEP/ELEC, etc). Expand a discipline to see its IFC classes; tap a class to highlight just those elements. |
| Room | Only if the building has volumetric room (IfcSpace) data | A highlight lens: the model is X-rayed and a translucent box is drawn over each room. Has its own Storey / Type / Path sub-toggle: group rooms by floor, by the compiler's own confidence tier (see Room health below), or route between two rooms the way a person walks. (On a building without volume data, this falls back to a plain isolate-by-room list instead.) |
| Material | Only if material data is present | Elements grouped by material name, or — via a Material / Category sub-toggle — by a derived construction category (Concrete, Metal, Wood, Glass, Drywall/Partition, Masonry, Insulation, Tile, Finish, Membrane, Flooring, Generic, Other). Categories are a keyword-derived heuristic, not an extracted IFC property, and are labelled accordingly in the panel. Highlight lens, same X-ray-and-box behavior as Room. |
| Phase | Only if a construction timeline can be generated for the building | Elements grouped by construction phase/task, generated on the fly (a short "Timeline generating…" message appears first). |
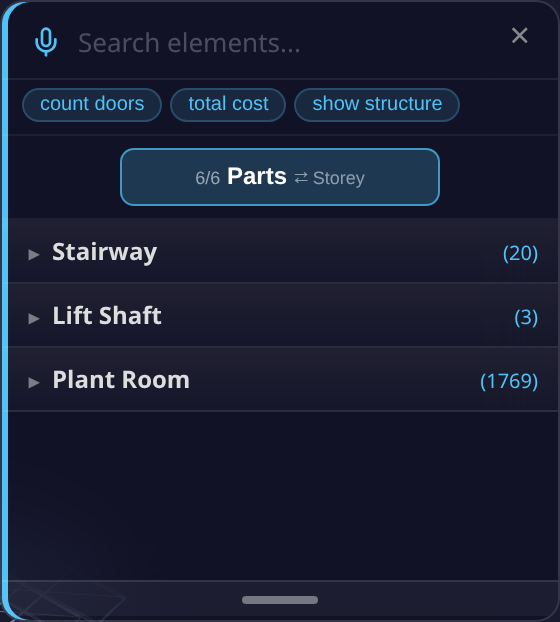
| Parts (new) | Only if the building has stairway, lift-shaft, or plant-room elements | Elements grouped into up to three building-part categories: Stairway (stair/ramp classes), Lift Shaft (elements named for lifts/elevators), Plant Room (HVAC-plant elements — vents, ducts, fans, AHUs, dampers, chillers, pumps). Each category is itself data-gated — it only appears if the building actually has a match. Tapping a category, or a single item inside it, isolates it in the 3D view (hides the rest of the model). |
Room highlight, verified live on HHS Office. Level 2 alone compiles 31 real rooms (105 across the whole building) — tapping one X-rays the model and draws a clean, correctly-bounded translucent box over just that room, confirming the room's geometry is well-formed and doesn't overlap its neighbours. On a larger building, the biggest rooms on a floor stand in for a "hall"-scale space until a real labelled corridor/hall example is captured (HHS's own rooms carry no such label yet — a future guide pass).
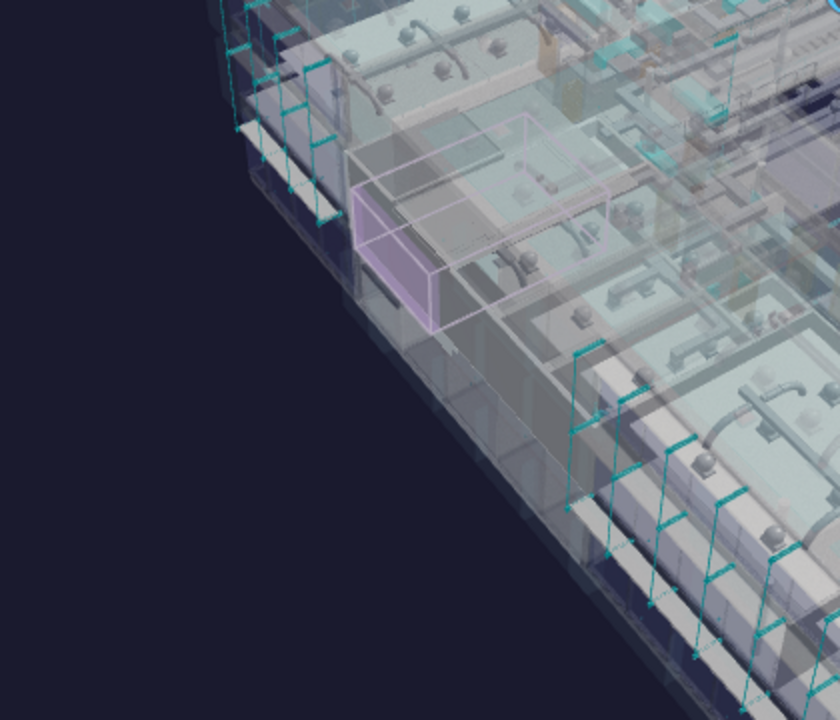
Known gap, not glossed over: tapping a room does not currently reframe the camera to it (confirmed live, 2026-07-12) — the highlight is accurate, but you may need to manually orbit/zoom to see a small room clearly on a large building. Tracked for a future fix.
The Parts axis is the newest addition (bim-ootb
d04ddd5) — seeprompts/VIEWER_FIND_PANEL_PARTS_VERIFICATION.mdfor its live verification on Duplex/SampleCastle data. A false-positive/missing-class-gate bug found after that verification (prompts/FIND_PANEL_PLANT_ROOM_GATE_FIX.md) is now fixed (bim-ootb PR #740/#742) — Plant Room only shows oncomplex-class buildings (Terminal, Clinic, Hospital, HHS), never on residential ones, and its keyword match is word-boundary-checked to avoid substring false positives like "Backflow Preventer" matching "vent".
Not yet confirmed from source, flagged rather than guessed: the exact on-screen wording of the axis
toggle's next-axis hint on narrow/mobile screens, and whether the typed-language decoder mentioned above
recognizes any further phrasing beyond the regex patterns documented — both would need a dedicated read of
decoder.js, which was out of scope for this pass.
Also discovered while capturing these screenshots (reported, not fixed here — this task is docs-only):
the natural-language query hint text described above is written into the DOM by navigate_find.js
_handleInput(), but the panel's results-expanded CSS class (which gives #find-results its visible
height) is only added by the plain-search code path, not the NL-query path — so, live, no visible hint
actually appears while typing a recognized phrase; the query still runs correctly on Enter. The guide
text above describes the observed (silent) behavior, not an invented visible hint.
Room health — the Type sub-toggle (verified live on Terminal)¶
Switch the Room axis's grouping from Storey to Type and rooms are grouped by the compiler's own confidence in them, not by a floor: INTERNAL / INTERNAL_SMALL (ordinary enclosed rooms, split by size) and SUSPECT_OPEN / SUSPECT_NO_DOOR (rooms the compiler could bound geometrically but flags for a human rather than silently accepting). This is the compile-with-honesty principle made visible — a low-confidence room is shown as low-confidence, never quietly promoted to "room" just because it fits inside walls.
Terminal, the hard case, verified live. A user-reported screenshot showed a stairwell counted as a room — the compiler doesn't know "stairwell" as a concept, only geometry, and a tall vertical shaft can look room-shaped from a single floor's footprint alone. The fix (STAIRWELL-STACK reject) rejects a room candidate whose footprint recurs, stacked, through multiple storeys with a real stair inside it — the signature of a shaft, not a room — checked against both compiler mirrors, 6/6 parity. Reloading Terminal applies the healed patch over whatever the browser had cached already: 59 rooms → 40 rooms, 73 rects, no room anywhere near the shaft threshold — the stairwell is gone from both the Room list and the 3D view.
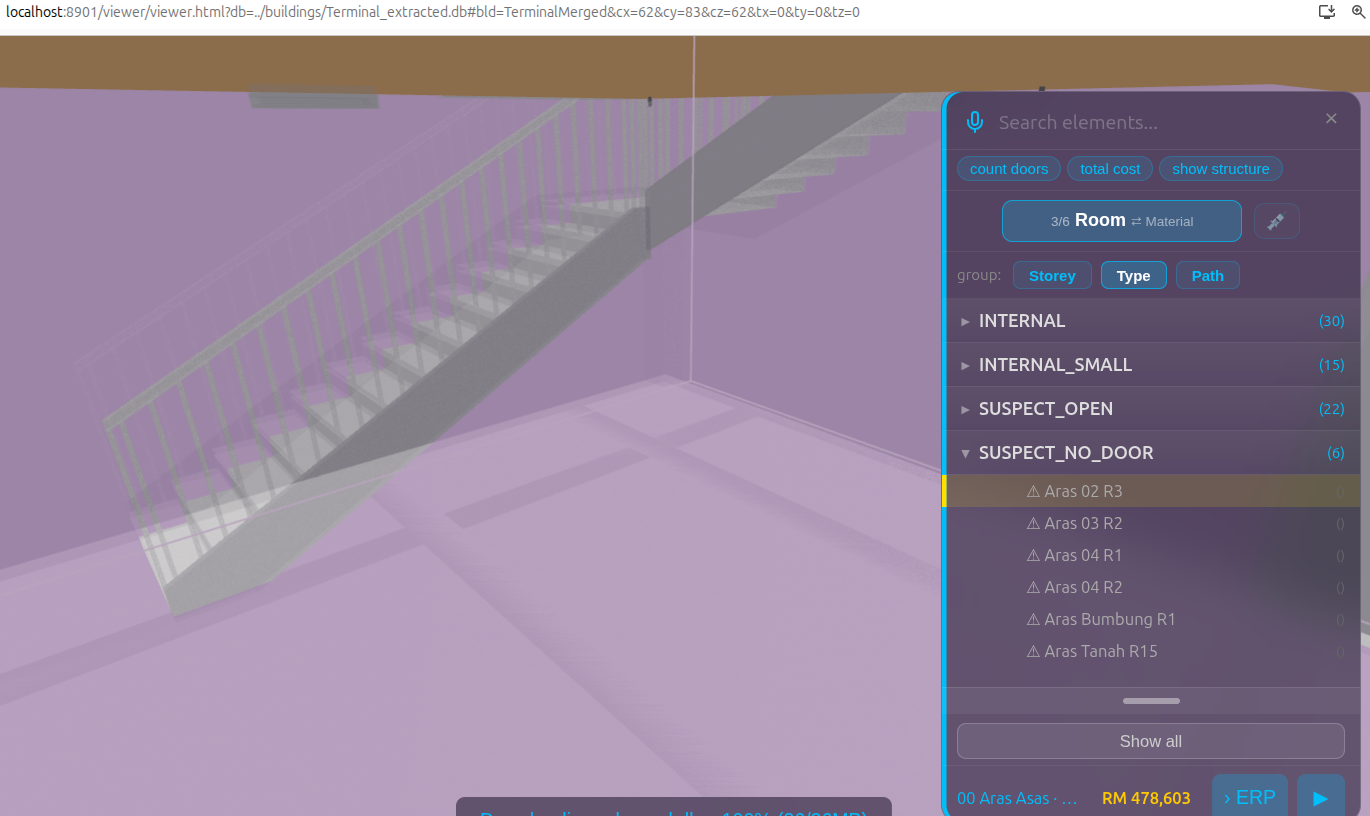
That SUSPECT_NO_DOOR pick is the demo frame: an empty pocket next to the stair, no door found bounding it, so the compiler says exactly what it knows and stops — it doesn't invent a door to make the room look finished.
Known gap, named not hidden: Type is a health taxonomy (how sure the compiler is this is a room), not a semantic one — it doesn't yet know "corridor" from "office." Terminal's concourses show no CORRIDOR band today because the only measured corridor template on file is Duplex's 10.4m² hallway (n=2 samples), and stretching that onto a terminal concourse would be inventing, not compiling. The room-path routing below already produces a building-relative, measurable definition of a corridor — the elongated, many-doored room every route keeps passing through — scoped as a future CIRCULATION_DISPLAY pass, not built yet.
Room-to-room paths & escape routes¶
With the Room axis selected, the Path sub-mode routes between any two rooms the way a person actually walks — out the door, along the corridor or concourse, and up or down the stairs when the two rooms are on different floors. The route draws as a line through the real doors and stair flights it uses, and the rooms along the way stay highlighted.
Verified live (2026-07-12): a real route across Terminal's floors returns several stair-crossing legs in sequence, not a single best-guess hop — each leg names the room and the door or stair flight it passes through.
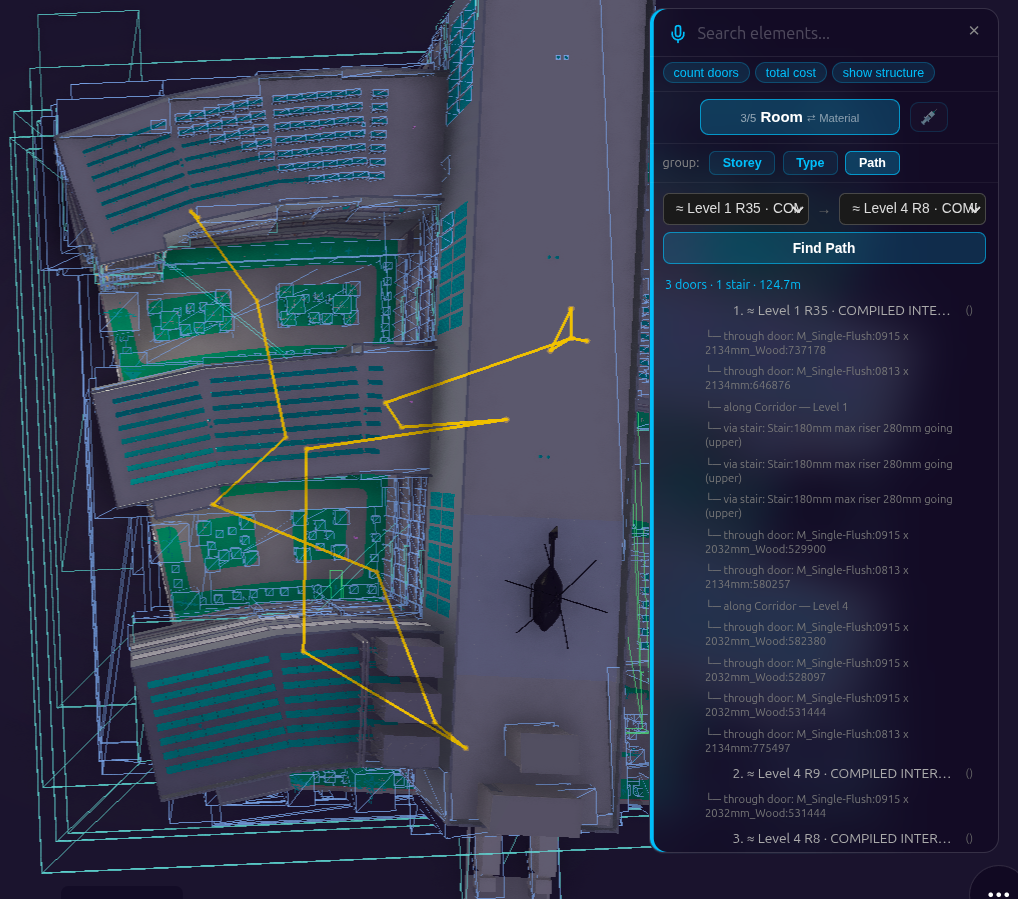
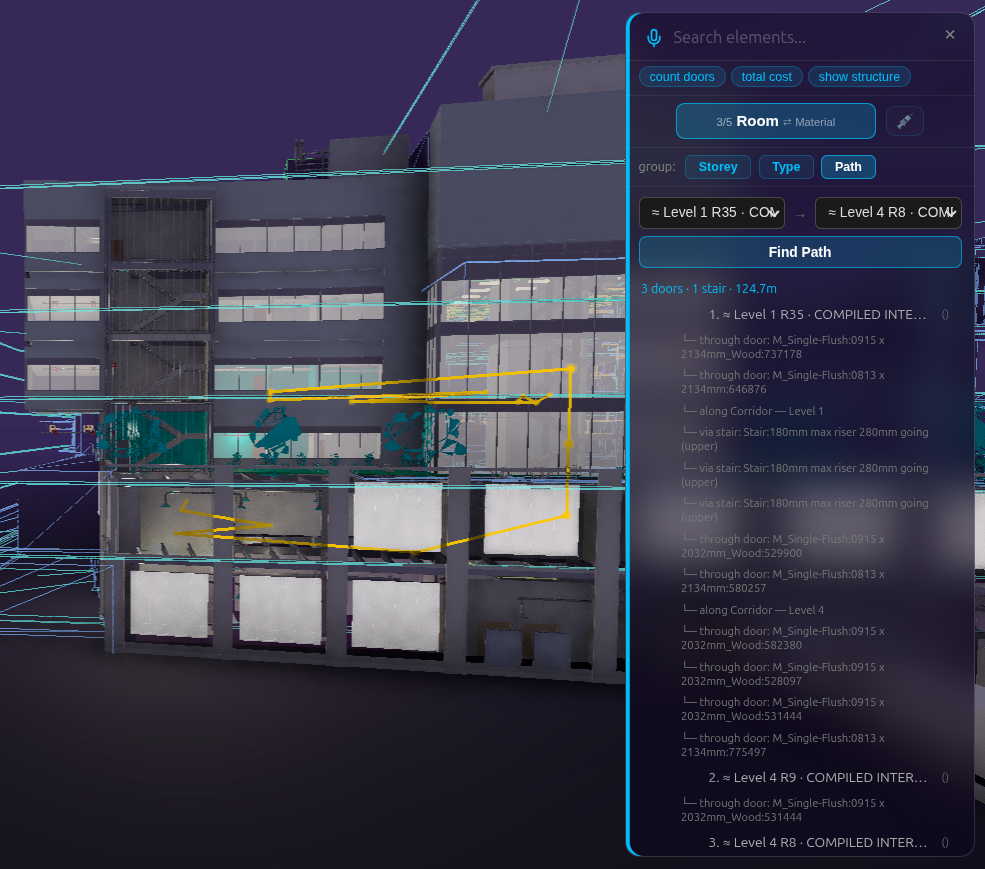
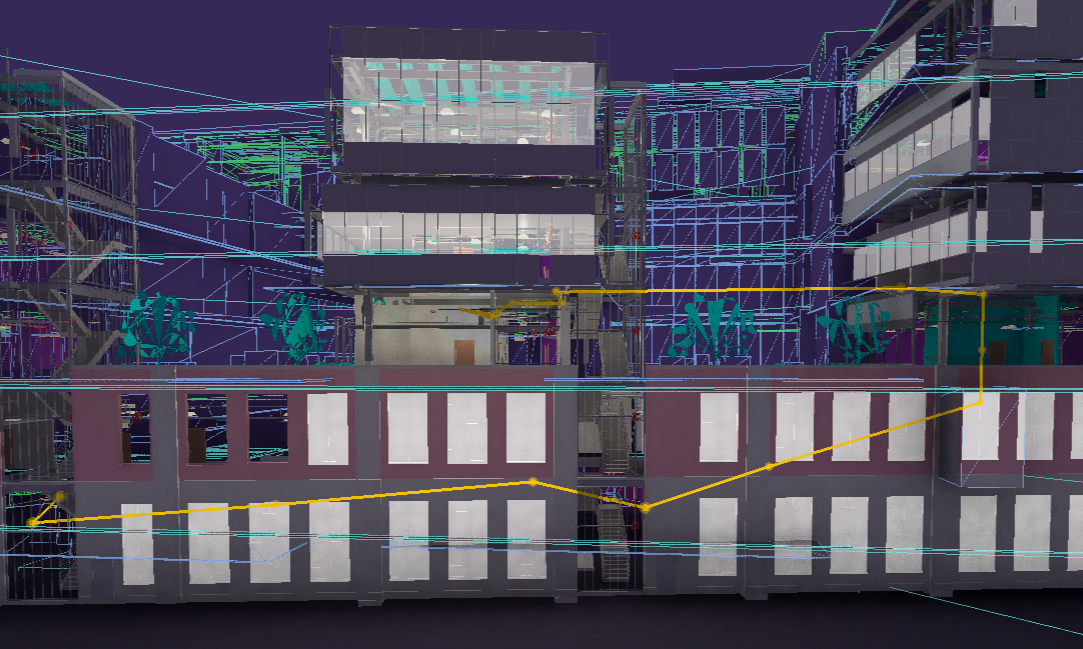
Fixed and verified live (2026-07-26): the drawn-line defect shown in earlier versions of the
screenshots above — a room-to-room path cutting straight through open air or atrium space instead of
hugging the real walkable floor — is fixed. The same Hospital route (≈ Level 1 R35 → ≈ Level 4 R8,
124.69m, same 3 doors and 1 stair as before) was re-run live after the fix: the 5 legality checks that
used to fail no longer need rescuing at all — most of those stretches are simply on real floor now, and
where a detour is still required (3 of 9 same-storey chords) one is found. Zero
§PATH_LEGAL_DETOUR_FAIL remain, and all 15 same-storey legs measure 0 illegal sample points (was
265 across 3 unroutable legs). The extra waypoints in the drawn line (polyPts 15 → 19) are the fix's
fingerprint, not a longer route — the 124.69m distance and the doors used did not change, deliberately,
because the fix only changes the drawn line, never which rooms or doors a route uses. Fleet-wide on
Hospital, a detour-failure sweep over 3023 real room pairs went 63.3% → 0.0% with zero newly-broken
pairs, room-pair pathability rose 69.4% → 91.2%, and unreachable (deg-0) rooms fell 26 → 7;
Terminal's off-floor sampling went 352 → 0, Clinic's 49 → 0. Root cause, plainly: (a) the walkable-floor
raster was consulted instead of the room data rather than together with it, so rooms compiled in the
browser after the raster was built had no floor under them; (b) doorways and stairs — the only ways
through a wall or between floors — weren't counted as walkable at all; (c) the raster builder picked
floor slabs in a fixed height window that missed Hospital's real floor plates by 5cm, dropping an
8270m² Level 4 plate entirely. Still imperfect, worth saying plainly: on Level 4 two chords needed a
wider-than-local detour search (§PATH_LEGAL_DETOUR_NONLOCAL), and the line passes one door twice — a
real ~3m back-step out of room R9 — so the drawn route is on real floor but not always the tidiest
line. Full technical trail, for anyone who wants it:
prompts/Viewer/FindRooms/VIEWER_FIND_PANEL_ROOM_ACCURACY.md §17 (supersedes §9–§16), shipped in
bim-ootb PRs #1006–#1009.
Future feature — fire escape: the same routing will pin a Fire Escape entry at the top of the path list — one tap from any room to the nearest building exit.
Future feature — mobile: scan a QR code posted beside a door to fetch that building's lightweight architecture model on your phone and see the escape route in Walk mode from exactly where you stand.
The rest of the Navigate drawer — World History, Page History & Home¶
The Navigate drawer (sailboat icon — see Find panel above for how to open it) has three more rows besides Find / Navigate:
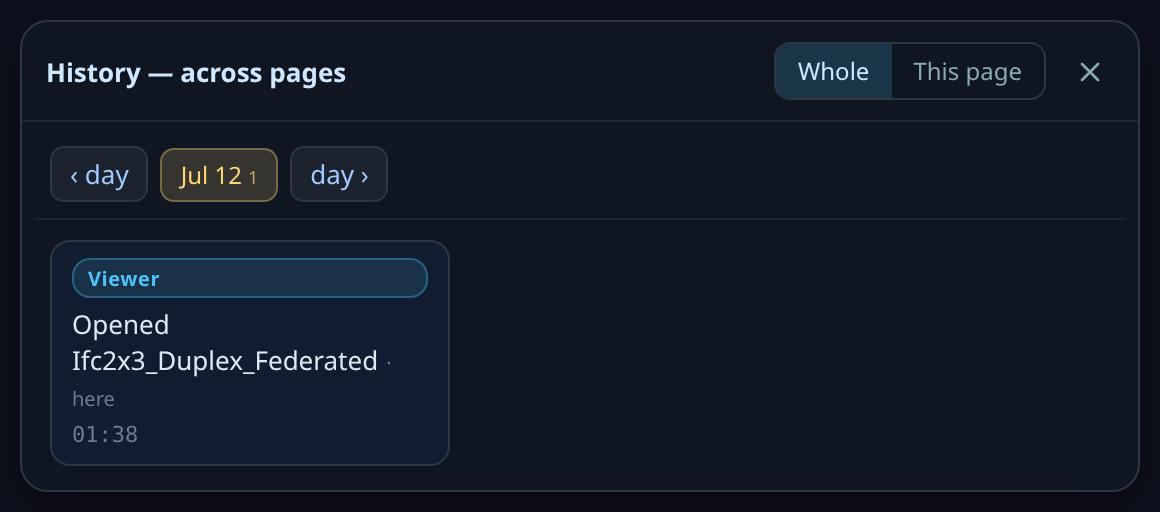
- World History (shortcut W) — a cross-page timeline: every significant action across every
page — Viewer, ERP, Gravity — in one place. Opens a card with a Whole / This page toggle, day-by-day
navigation (‹ day / day ›), and one entry per action (what happened, where, and when).
- Page History (shortcut Z) — this page's own compact dot-timeline, a small step-back/step-forward
bar. It only lights up once you've made edits in this session — a fresh session shows an empty strip
(the pair of arrows either side of a single dot), as captured here.

- Home — returns to the front-door hub (the same page the Quick Start walkthrough starts from). Installed as a standalone app (PWA), it opens the live hub online, or falls back to the cached hub offline.
Inspect drawer — Measure, Clash, X-Ray, Section, Time Machine, 4D/5D, Fly Tour¶
The Inspect drawer (compass icon, next to Navigate on the toolbar rail) bundles seven tools behind one icon:
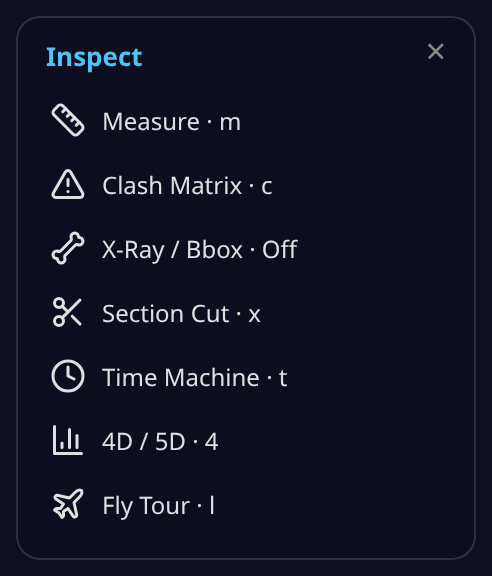
- Measure, X-Ray / Bbox, Section Cut, and Fly Tour are covered above, under Viewer Features.
- Clash Matrix (key C) opens the clash-detection engine (discipline-pair grid, tolerance, Review / Resolve / Accept status, HTML + CSV export) — full coverage: Clash Detection guide.
- Time Machine (key T) opens the 4D construction timeline — author a schedule, play it back,
try a What-if slip, share a
?tm=playlink. On a large building (100K+ elements), a box-cube pill in the panel header trims GPU cost by rendering already-built-but-out-of-view elements as lightweight wireframe boxes, keeping whatever you're actually looking at full LOD400. The schedule it plays is generated element-by-element from the model's own geometry, and it holds a measured invariant — no element appears before the first element it physically touches appears (0 violations across 266,954 elements on seven buildings; see the generated 4D movie for the numbers and the stated limits).
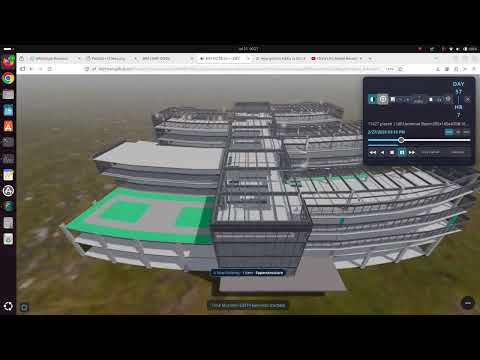
Full authoring/editing/import walkthrough — including direct Gantt drag/resize/link and the
⏪ Pull Back (reschedule-as-early-as-possible) action — lives on its own page:
Time Machine — the 4D construction timeline (not re-documented here — same
building, same feature, reached from either app), including the
ERP-side entry point — picking an
element in 3D (or a red Zoom Across pill on an ERP record) jumps the Time Machine straight to
that element's construction moment.
- 4D / 5D (key 4) opens the analytics dashboard (boq_charts.html) for the loaded building in a
new tab — full coverage: 4D/5D Analysis guide.
Camera / View drawer¶
The Camera / View drawer (camera icon) bundles three camera-control toggles:
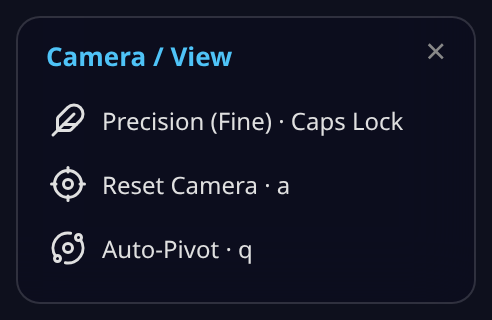
- Precision (Fine) (Caps Lock) — slows orbit/pan/zoom for fine, deliberate camera moves (e.g. lining up a screenshot or a measurement).
- Reset Camera (key A) — snaps the camera back to its default orbit position.
- Auto-Pivot (key Q) — toggles automatic pivot-point recentring as you orbit, so the camera keeps turning around whatever's in view instead of a fixed point.
Cinema Film-Maker (Alt+C) — the BIM OOTB Film-Maker¶
Alt+C computes a complete cinematic film of the building — dive in, settle on the largest occupiable space, walk out through a real door, orbit the exterior — in well under a second, from the model's own room graph. No camera path is authored by hand; the defaults come from measured geometry (room area, reachability, door position, clearance), not a guess.
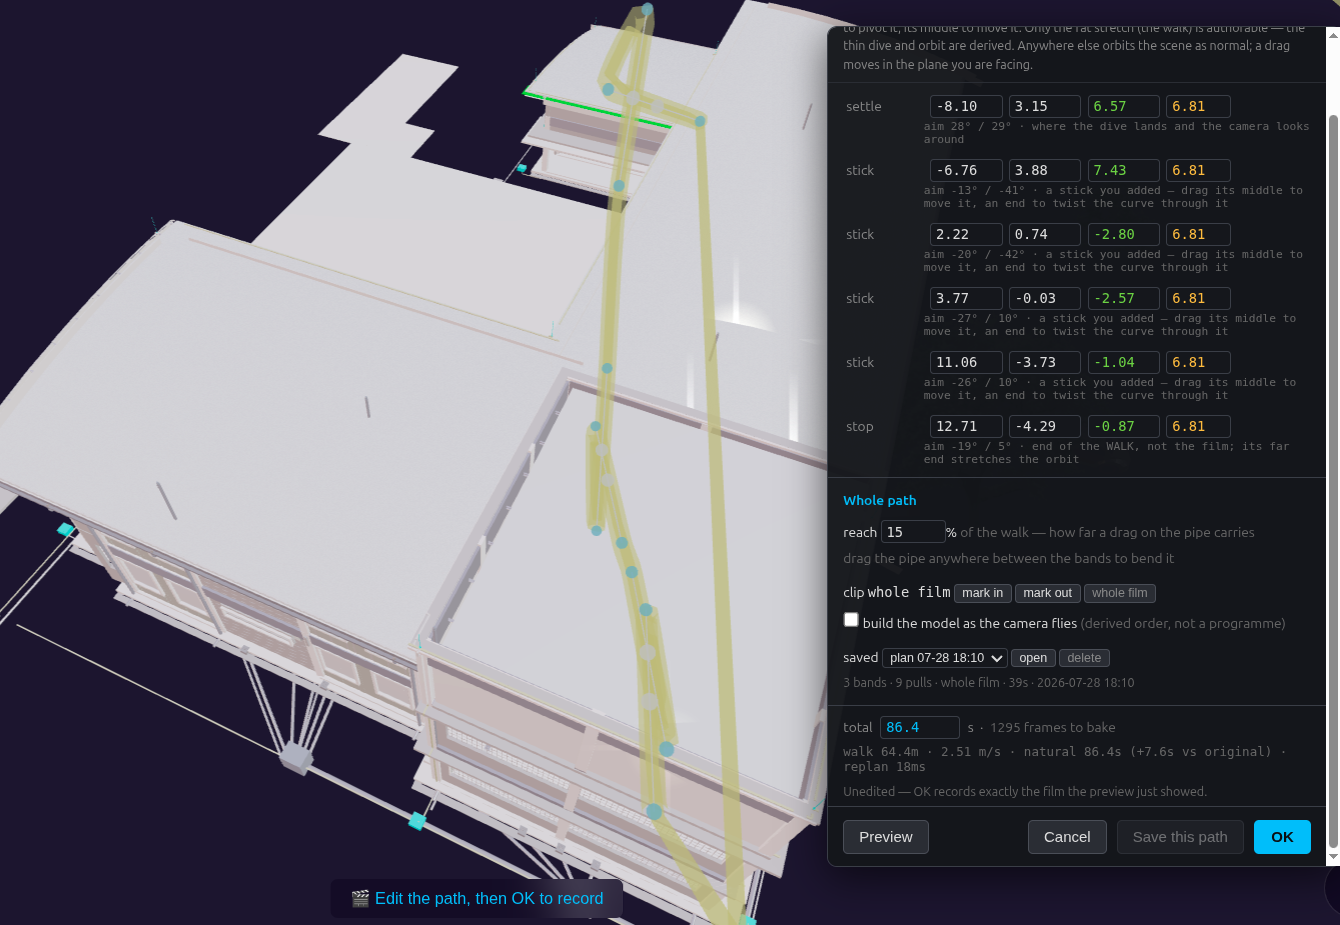
Before recording starts, a Cinema path panel opens with the whole film drawn as a yellow tube through the building. You edit the flight by dragging the flight itself — there is no separate storyboard or keyframe list:
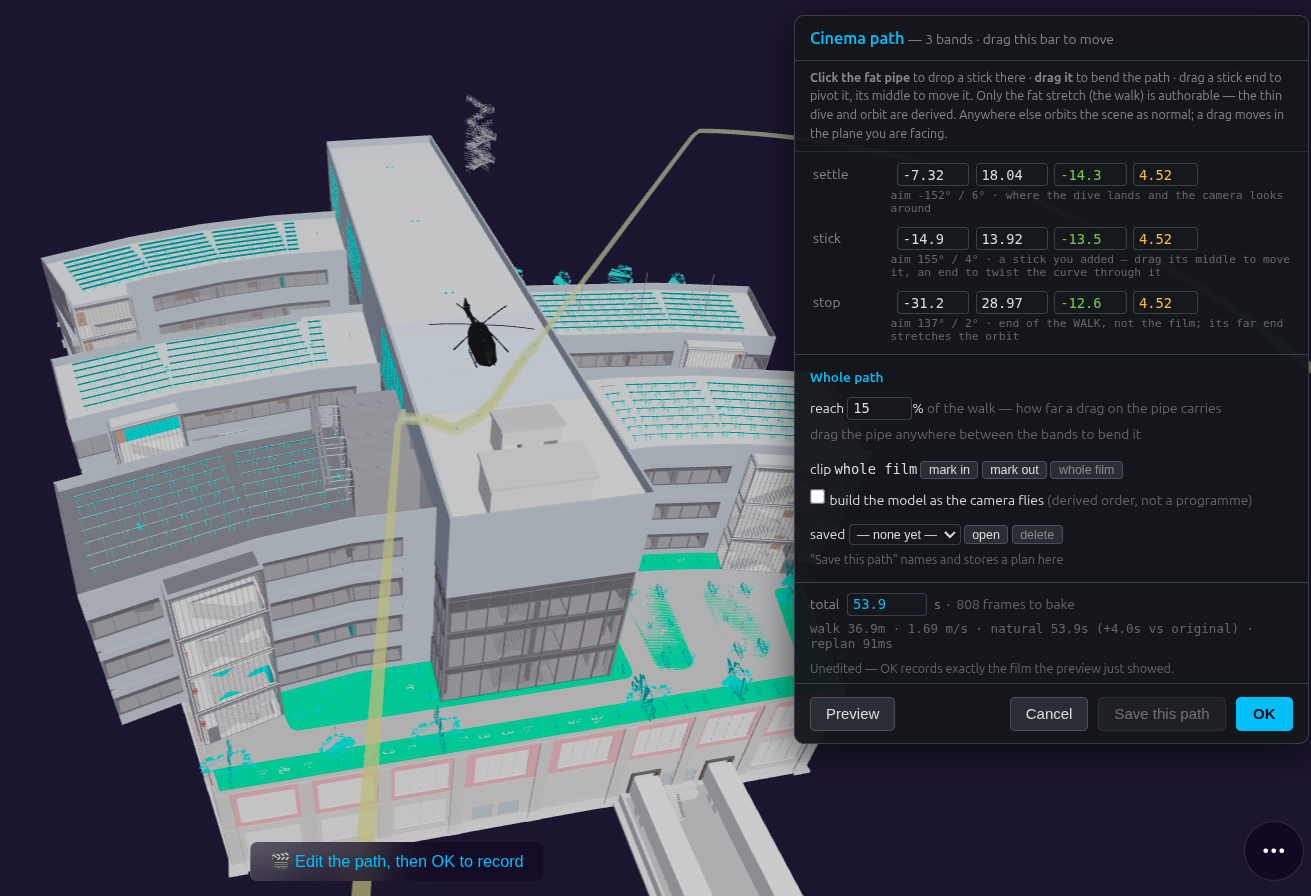
That is the whole film, derived, before you touch anything — and the footer says so: "Unedited · OK records exactly the film the preview just showed." Pressing OK here is already a complete take.
The bands — the rows in the panel¶
Every row is one straight band of the flight, listed in flight order with its own x, z, height (green) and length (orange) fields, plus its aim angles:
- settle — where the dive lands and the camera looks around. Always the first row.
- stop — end of the walk, not the film; its far end stretches the exterior orbit that follows. Always the last row.
- stick — any band you added yourself, labelled with how far along the walk it sits. A derived path opens with one; the screenshot below has four.
To work with them:
- Click the tube anywhere along the walk to drop a new stick there. A fresh stick lies exactly along the curve, so the film does not move until you move it — dropping one costs nothing.
- Drag a band's end to pivot it about its far end (length is fixed, so this aims a leg — use it to turn through a different doorway).
- Drag a band's middle to move the whole band without pivoting.
- Press
×on a stick's row to remove it. settle and stop have no×— the dive lands on one and the orbit stretches off the other, so removing either would change what the beats mean. - Anywhere else orbits the scene as normal — no freeze, no modifier key. A drag moves in the plane you are currently facing, so orbit to a side view when you need to change height.
Walk finger mode — walk into the shot, plant the stick where you stand¶
Dropping sticks by clicking the tube works from the outside looking in. Walk finger mode does the same edit from the inside: you walk through the building in first person and plant the stick exactly where you are standing, aimed exactly where you are looking.
- Press the eye on the Cinema path panel's title row — the POV frame opens bottom-left, showing the film's own camera view.
- Press the shoes (footprints) icon on the POV frame's header. You are now standing inside the film, at the start of its walkable stretch, at walking height. (Optional shortcut: drag the timeline bar to a point along the walk first, and the shoes start you there instead.)
- Walk with the usual trackpad moves, all shown in the POV frame: move your finger to look around; pinch out or scroll to glide toward what you are facing (hold Shift to glide faster); the W A S D keys do the same moving from the keyboard. The rest of the screen freezes while you walk — that is deliberate, it keeps the walk smooth on large buildings.
- Enter or Spacebar plants the stick — where you stand becomes its position, where you look becomes its aim — and drops you straight back into the editor to review it. A click plants the stick and keeps you walking, for laying several in one pass. Esc leaves without planting. Pressing the shoes again continues from the exact spot you left.
Proof from a real session on the Terminal building: the user walked into the POV, hit Spacebar, and stick @ 13% appeared — the new row highlighted in the panel and its blue middle dot on the path in canvas right beside it. One keypress, one stick, position and aim both set:
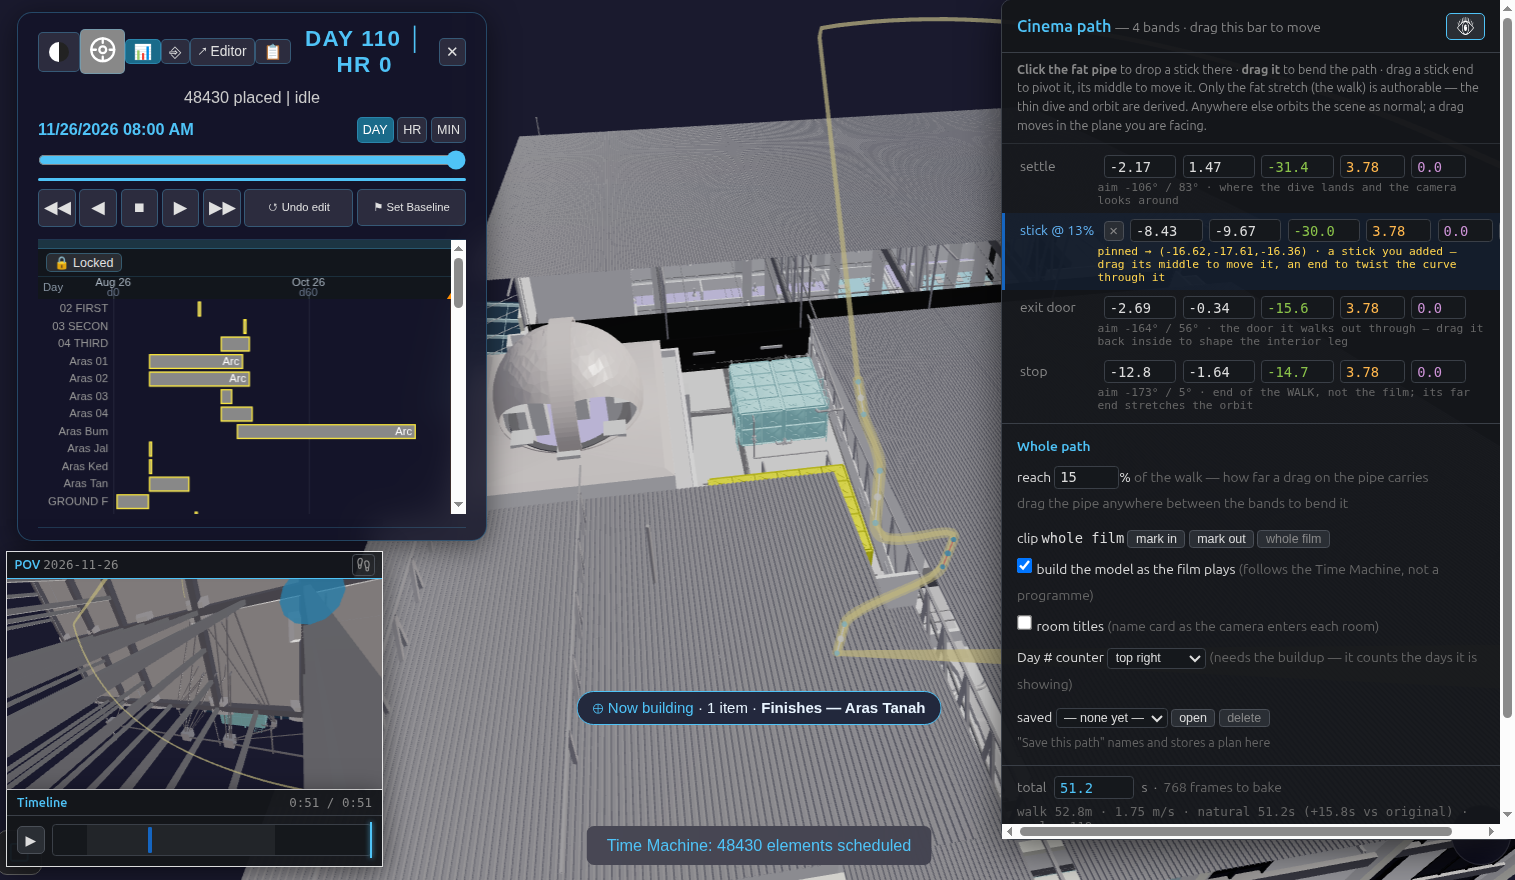
Two small behaviours keep this honest: planting re-shapes the flight around the new stick immediately (the brief pause is the film re-deriving), and clicking again at the stick you just planted does not stack a duplicate — the editor reads it as "I'm done here" and returns you to review.
Whole path — the controls that act on the entire film¶
- reach % — how far a drag on the tube carries along the walk. Drag the tube between the bands and it bends like a hose, falling off over that reach; a small reach edits locally, a large one sweeps the whole flight.
- clip · mark in / mark out / whole film — trims the film to a window without changing the path. ⚠ Marking uses the point of the film nearest your camera, so put the camera close to the spot on the yellow tube where the cut belongs before pressing — marking from a wide exterior view lands on whichever part of the flight happens to pass closest to your eye. whole film clears the window.
- build the model as the camera flies — the construction reveal. See the 4D note below.
- room titles — a name card appears as the camera enters each room, sourced from the room's own friendly name, never invented.
- Reveal — cycles every discipline in the model past the camera in turn. See below.
- Clash pairs — the model's mesh-true clash pairs (not the bounding-box list, part of which is false)
appear as red/blue pulsing markers from frame 0, so you see where the trouble is before it's built. A
pair that comes near the camera gets an on-screen label naming both sides, plus a
[tolerance mm /
  clash mm]
line beneath them — the tolerance from that discipline pair's own rule, the clash figure from the real mesh overlap depth, not a bounding-box estimate. The Reveal round's rotating stat cards also gain a "N mesh-true clashes flagged" card while this is on. - Measure — the setting-out drawing, from the real column grid: numbered and lettered bubbles, bay
chains that sum to the overall, and storey rules. It is up at frame 0 — built from the database, so
it does not wait for the model to load — and it is drawn in the model's own planes. The upright
storey rules occlude normally as the buildup rises — that occlusion is how you see them sitting
behind the building rather than painted on the lens. The ground plan lines shine through the
building instead: a live check found them fully hidden behind the building's own walls from every
camera angle otherwise, including the opening shot, so occluding them would mean they were never
actually seen. The chains are checked rather than
claimed — on Hospital, HHS and Terminal the bay chain sums to the overall exactly on all three axes
(
X 95.915 = 95.915, and so on), with no per-building tuning. ⚠ Where a federated model records the same storey at two elevations, the drawing states the fault and draws the levels as recorded rather than choosing between them — resolving it would be inventing a datum the file does not contain. - Storey highlight — each storey's facade (its exterior walls only, not the whole floor) glows
blue / green / yellow / orange in turn over the last 10 s before the closing orbit, with a
door-count and footprint HUD card for each shown in the same corner panel every other measure
uses. An exterior wall is already visible from the closing orbit shot on its own, so nothing else
in the building is touched, dimmed, or made transparent for this.
⚠ The card's counts are read per storey name. On a federated model whose storey table carries alias
or duplicate names (one Terminal file lists 22 names for six real floors), the highlight can land on
alias rows and the card then reads
doors 0— the doors are real, they are attributed to the storey names the highlight did not pick. - Silent-bake size — a resolution/fps preset (720p, 1080p, or 1440p) for a silent bake only (see below); an interactive Alt+C recording always uses the size of the window it's pressed in, so this select doesn't resize anything here — it's just remembered on the saved path. There is currently no time estimate shown next to it; picking 1440p over 720p costs real extra bake minutes with no on-screen warning yet.
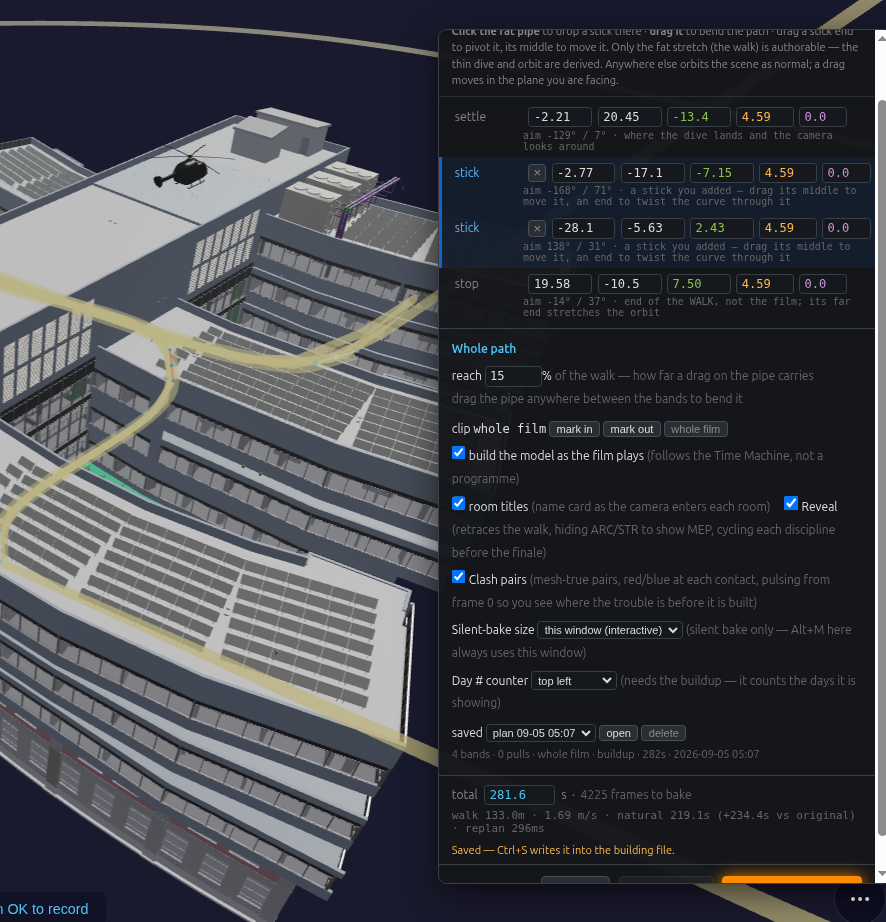
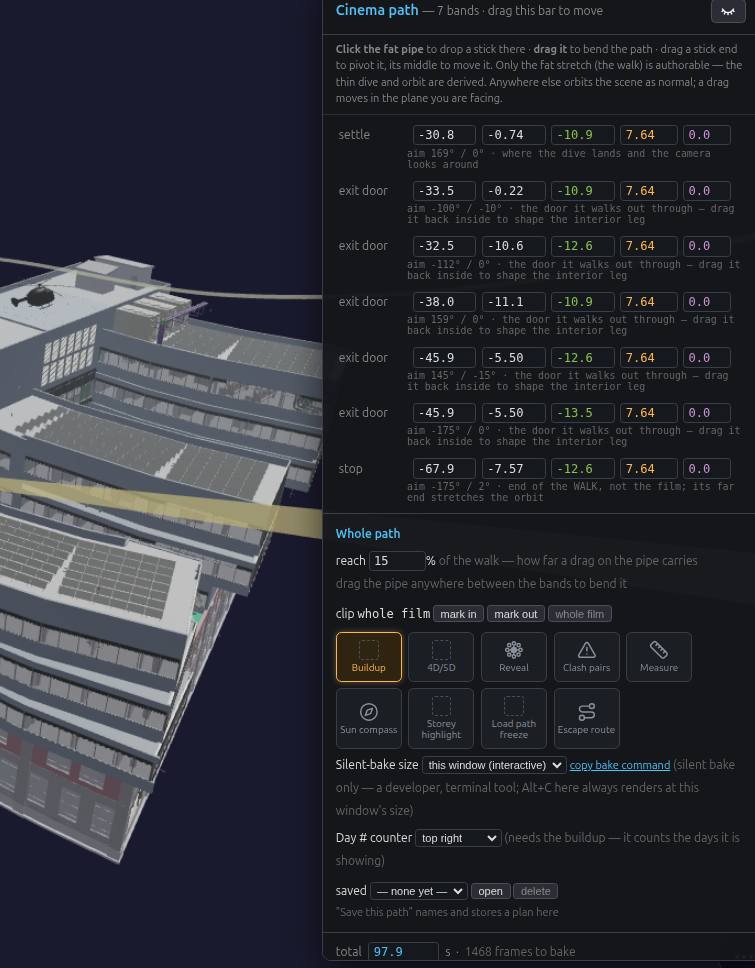
- saved — plans you stored for this building, with open and delete. Choosing one and pressing open replaces the path you are editing; the line under it says how many bands, how many hose pulls, the clip window and when it was saved.
Timing, preview and recording¶
The total field is seconds, and the line beneath it reports the derived reality: walk length, walking speed in m/s, the natural duration, and how far your edit has moved it. Total duration is derived per building from real walk distance and pull-back distance, never a fixed number — a small building's film is shorter than a large one's by construction, not by a setting.
- Preview flies the current edit so you can watch it before committing to a bake. The panel tells you when what you are looking at is older than your last edit.
- Save this path stores the plan — both into the building (so it travels with the file when you save it) and as a named entry in the saved list above.
- Cancel discards; OK records the film exactly as previewed. If you touched nothing, that is byte-identical to the un-edited default — opening the panel to look costs you nothing.
The 4D reveal — and what it may honestly be called¶
With build the model as the camera flies ticked, the model assembles as the film runs. What drives that order depends on the data in your building, and the viewer picks automatically:
| your data | what drives the reveal | what to call it |
|---|---|---|
| no dated tasks | the derived build order, re-keyed to the flight | "derived build order" — never "the schedule" |
| real dated tasks (a 4D schedule authored or imported into the building) | each element's own schedule_start |
"a linked 4D schedule" |
A building with a real schedule reveals by that schedule and nothing is re-ordered. The practical workflow is to preview the Time Machine first — its Gantt is in the Inspect drawer — and then place your mark in / mark out against what the programme actually shows.
Watch the film this feature produced on a real building.
Discipline Reveal — walk it twice, once dressed, once bare¶
Tick Reveal (beside room titles) and the film grows a second act after the normal walk-out ends, before the closing orbit:
- A brief pull-out from the spot the walk just ended on — the camera eases back a short distance, still looking the way it was looking, a beat to mark that the walk itself is done.
- A fast retrace back to where the walk began — the camera flies back along the exact same route it just walked, at a quicker pace than the walk itself, easing in and out so the motion reads as one continuous flight, never a jump cut.
- The same walk, a second time, with the architecture hidden. Walls, slabs and structure fade out of the shot for this lap only, so every other discipline present in the model — mechanical, electrical, fire protection, plumbing, whatever the building actually has — shows through at once, exactly where it really sits.
- A parade, one discipline at a time. Each discipline present takes its own short turn alone on screen, named on the title card in place of the room name, smallest-average-element disciplines first and MEP last — MEP's own ducts and pipework tend to be large and easy to spot even briefly, so it doesn't need the early slot the finer trades do. Each hand-off holds both the outgoing and incoming discipline on screen together for a moment rather than swapping instantly, before All Disciplines together closes the parade.
Every distance and duration in this second act is derived from the same real geometry the rest of the film uses — the pull-out, the retrace and the walk are each priced by a real speed times a real measured length, never a fixed number tuned to look right on one building.
Sun, sky and shadow while the film records¶
A recorded film is not lit the way the live viewport is. The moment recording starts, the viewer stages a photographic pass — and it keeps running while the 4D reveal assembles the building, so the light and the construction sequence advance together in the same take:
| what happens | detail |
|---|---|
| The sun travels | It starts at a high 55° "late morning" angle and sinks to a 6° dusk by the last frame. Shadows lengthen and swing across the film — the sun is not parked. |
| Real cast shadows | The building, its rooftop plant, and the distant skyline all cast real shadows onto the ground, at a 4096² shadow map for the recording only (the live viewport uses a cheaper one). The shadow frustum widens as the sun drops so a long dusk shadow isn't clipped at its tip. |
| Atmospheric sky | A physically-based clear-sky scattering model (Preetham), pushed warmer and hazier for the shoot — deeper reds and a tighter sun glow near the horizon than normal navigation shows. |
| Photographic reflections | Glass and metal reflect a real photographed sky (HDRI), refreshed as the sun moves, so the glint tracks where the sun actually is at that moment of the film. |
| Warm evening key light | The sun tints warm and window/fixture glow comes up as the light falls. |
You can also stage a single still rather than a whole film: Alt+S applies the same photographic pass and then refines the frozen frame over 16 jittered sub-pixel samples for clean edges. Alt+J adds an optional bounce-light (GI) pass — off by default, and deliberately excluded from film recording because it costs far more per frame than a film's frame budget allows.
What this is honestly not. There is no weather: no rain, no snow, no cloud shapes — the sky model is a clear-sky one and has no cloud geometry at all. And it does not claim to be indistinguishable from a photograph: the geometry is idealised IFC with no real-world wear, materials are assigned by class rather than hand-tuned per surface, and nothing is colour-graded per shot. What it does target is the good-archviz tier — and, unlike a still-render tool, it does it while the building assembles itself to the programme.
Baking without the browser — the silent bake (developers)¶
Everything above records the film from the viewer window: press Alt+C, edit, press OK, and watch it bake. There is also a command-line path that bakes the same film with no window and nobody watching, added 2026-09-01. It is a development tool — it is gated behind an internal flag that a normal viewer session never sets, and there is no button for it.
It exists because a film is expensive to check. A bake takes tens of minutes, so a defect in the HUD or the pacing used to be found only after sitting through the result. The silent bake lets the same film be produced, measured and re-run from a terminal, so what used to be a wait becomes a test.
node cli_silent_bake.js --db HospitalAjaibPath --out /tmp/hospital.mp4 \
  [--plan NAME | --override file.json]          path source (default: the DB's cinema_path table)
  [--buildup] [--label] [--reveal] [--clash] [--day tr|tl|br|bl|off]     turn a setting ON for this run
  [--no-buildup] [--no-label] [--no-reveal] [--no-clash]                 turn a SAVED setting off for this run
  [--frames N | --seconds S] [--fps N]          length (default: the plan's own pacing)
  [--gpu sw|real|headful]
  [--width W --height H] [--port P] [--log FILE] [--profile DIR]
  [--stall-min N] [--max-frame-ms N]            health watchdog — aborts early, not at the end
  [--timeout-min N]                             hard wall-clock cap
With no flags at all, the saved path decides. That is the normal way to use this — save the film
you want in the viewer, then bake it from the terminal with nothing but --db and --out.
It bakes your saved path, not a fresh derived one. When you press Save this path, the plan is
written to two places: a browsable copy in the browser's own storage, and a portable copy in the
building DB's cinema_path table that travels with the file. The command line reads the second one by
default, so a path saved in the viewer bakes from the terminal with no export step. --plan NAME picks
a named plan instead; --override file.json takes one directly.
The saved path carries its settings with it, not just its shape — the buildup, the room titles, the Reveal round and the day-counter corner you had ticked are all restored. The run announces what it resolved, so there is no guessing whether a setting survived:
§CINEMA_PATH_RESTORE bands=4 total=278.8s holdCol=true flagCol=true buildup=1 roomTitle=1 reveal=1 dayCounter=tl
§CLI_BAKE_RESOLVED source=db:cinema_path bands=4 total=278.8s buildup=1 roomTitle=1 reveal=1 dayCounter=tl
The corner is worth calling out on its own, because it moves more than the day counter: the HUD is one
stacked column, so dayCounter=tl puts the day counter, the path-overview box and the panel beneath
them all on the left. One preference, one column.
⚠ A file saved before 2026-09-04 carries no settings. Until that date the portable table stored the
path's shape and its beat seconds and nothing else, so a bake of an older .db resolves every setting
OFF no matter what you had ticked when you saved it — the file was not wrong about the path, it simply
never carried the answer. §CINEMA_PATH_RESTORE says which kind of file you have: flagCol=false is the
old shape. Re-save the path once from a current build and it travels properly from then on. In the
meantime the flags above still work, which is what they are for.
Arguments override the saved settings, in both directions. A flag you do not pass leaves the saved
value alone — that is why a bare --db/--out run reproduces exactly what you authored. Passing
--buildup turns it on over a saved off; passing --no-buildup turns it off over a saved on. So one
saved path can be baked several ways without re-saving it, which is how you compare two cuts of the same
film:
node cli_silent_bake.js --db Hospital_silent --out /tmp/full.mp4      # exactly as authored
node cli_silent_bake.js --db Hospital_silent --out /tmp/nobuild.mp4 --no-buildup   # same path, no 4D build-up
Use --gpu real. Headless Chrome defaults to software rendering, which is far too slow to finish a
film. --gpu real reaches the machine's actual GPU with no display attached, and the run prints which
renderer it got so the choice is never assumed. --gpu sw is kept only for comparison.
Measured on this machine (RTX 4060 laptop, headless). A saved path is always shorter than the film it produces, because the Reveal round's second act is derived rather than authored:
| building | elements | frames | film | wall clock | per frame |
|---|---|---|---|---|---|
| HHS Office (federated) | 6,880 | 1,901 | 126.7 s | 15 min 21 s | 0.485 s |
| Hospital | 63,415 | 2,937 | 195.8 s | ~30–45 min | 0.6–0.9 s |
A later, separately-measured Hospital run (2026-09-05/06, same building, --clash on, 1920×1080@24,
same RTX 4060) came back 4,699 frames for the same 195.8 s film — a different frame count for the same
duration than the row above, most likely a later change to the film's own fps/pacing rather than this
guide's row being wrong; not reconciled here. At that frame count: 5,476 s (~91 min) wall clock full
run, ~83 min on a repeat run the same night — call it 80–90 minutes at 1080p with clash markers on.
1280p/1440p have not been measured.
Hospital carries 9x the elements for under 2x the per-frame cost — the frame cost scales far
better than the model does, and most of the difference in wall clock is simply that its film is longer
(its walk is 278.8 s to HHS's 61 s, and its Reveal round adds 87.4 s of its own across four
disciplines instead of one). Three shipped mechanisms are what make that rate possible, and each names
itself in the log so a regression is visible rather than guessed: §MAXQ_FRAME_BUDGET (a baked frame
costs 20 composer renders, not 40), §NIGHT_BAKE_POOL (the point-light count is frozen for the bake —
a changed count recompiles every shader in the scene, measured at 13–53 s for such a frame against
0.8–1.3 s when it holds), and §GLOW_BUILDUP_EARLY_OUT.
What this is honestly not. It is not a faster renderer — it bakes the same frames at the same
quality settings as the window does, and it will not make a film cheaper than the frame budget allows.
It is not a user feature, and it does not replace watching the result; what it replaces is guessing.
Its real value is that the film's own §-tagged log can be read afterwards and asserted against — which
is how several shipped-but-unverified behaviours were finally confirmed to fire in a real bake rather
than only in theory.
Display options — Palette, Night, Shadow + Ground, Background, Sound FX¶
The Palette pill (key P) opens one panel for every visual-appearance control — five lighting sliders, plus four more toggles appended below them:
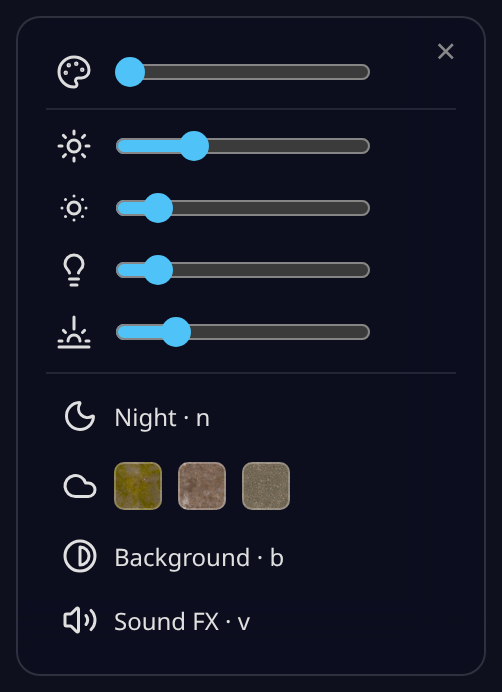
| Control | Shortcut | What it does |
|---|---|---|
| Ambience / Sun / Exposure / Ambient / Hemisphere | — | Five sliders — overall scene lighting, sun intensity, camera exposure, ambient fill light, and sky/ground hemisphere light. |
| Night | N | Toggles a night lighting preset. |
| Shadow + Ground | H | Cycles Off → Grass → Earth → Paved — a real ground-texture swatch under the building, with matching shadows. |
| Background | B | Reverses the background (dark ↔ light/white). |
| Sound FX | V | Toggles synthesized UI/Time-Machine/Fly-Tour sound cues — no audio files, off by default. |
Settings¶
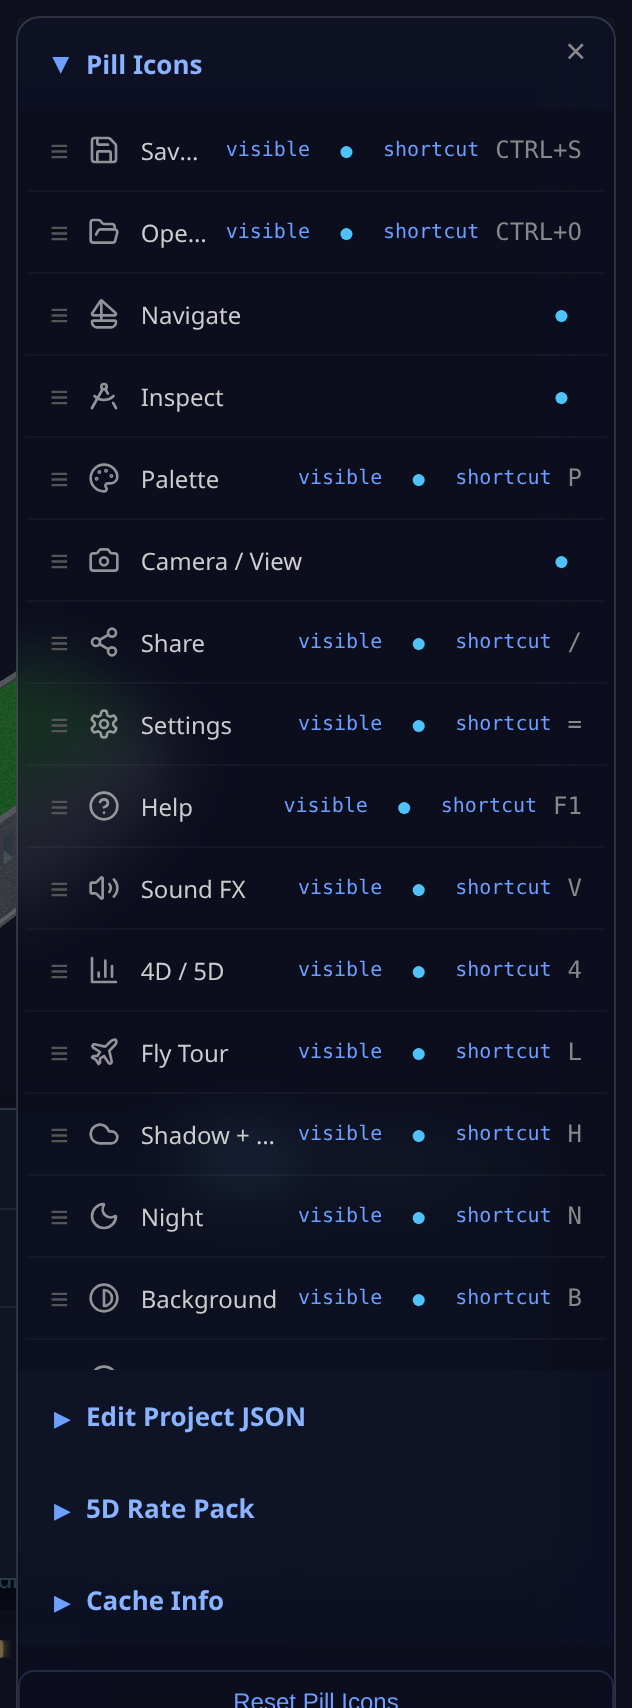
The Settings pill (key =) opens a panel with four sections:
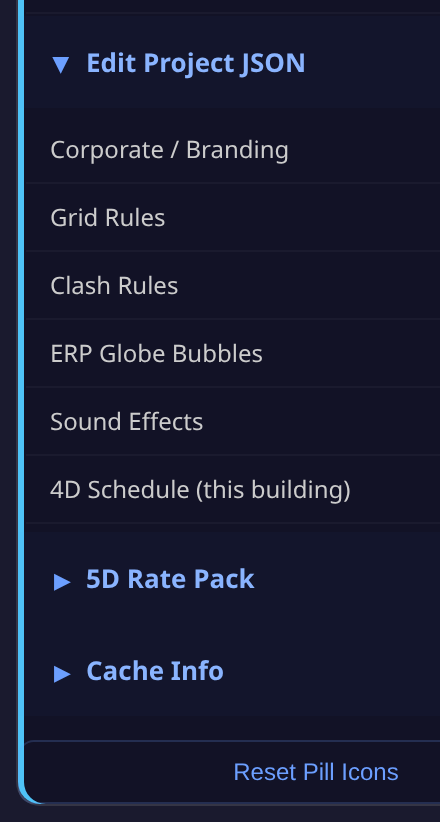
- Pill Icons — show/hide/reorder every toolbar action, and see each one's current shortcut key at a glance (this is also how a hidden action like a data-gated drawer row becomes visible once its data exists). A Reset Pill Icons button restores the defaults.
- Edit Project JSON — a power-user hub: open and edit any of the project's config files directly in-browser (auto-inferred form fields, not raw text), then Download the edited file to commit back to the repo, or Reset to discard the override. Six files are registered: Corporate / Branding, Grid Rules, Clash Rules, ERP Globe Bubbles, Sound Effects (the audio parameters file — distinct from the Display-options Sound FX on/off toggle above), and a read-only view of the 4D Schedule captured for the currently-open building (the same data Time Machine authors).
- 5D Rate Pack — pick which cost-rate pack is active (the same rate pack the Find panel's
total costquery and the 4D/5D dashboard both price against). - Cache Info — see how much this building's data is using in IndexedDB, and clear it.
Save & Open a building¶
Two toolbar pills, both native-dialog verbs — distinct from the Hub's building-open flow in Quick Start:

- Save Building (Ctrl+S) — saves the currently open building, including any session edits
(clash resolutions, captured 4D schedule, etc.), to a
.dbfile via the browser's native Save As dialog. - Open Building (Ctrl+O) — opens a previously-saved
.dbfile via a native Open dialog, replacing the current scene.
Share¶
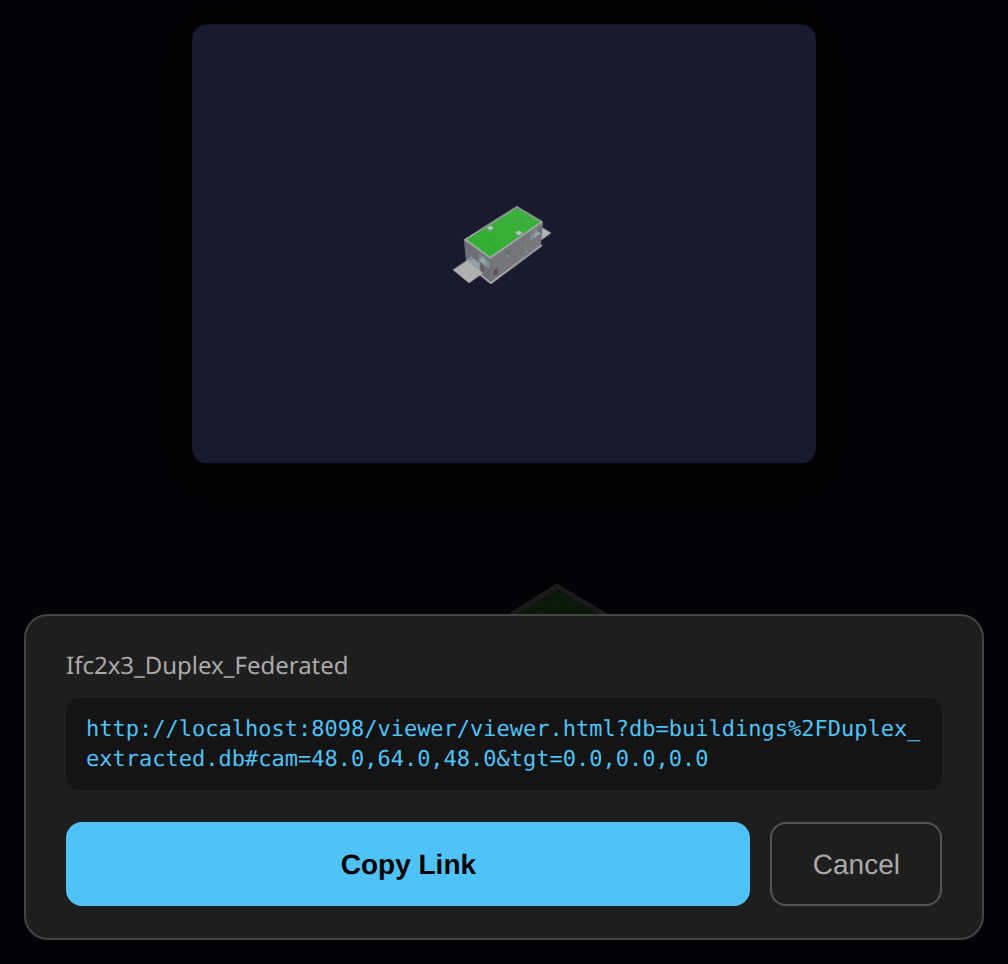
The Share pill (key /) is a step up from the plain deep-link URL: on mobile, it hands the current view to the device's native share sheet with a snapshot photo attached; on desktop (no native share API), it shows a preview card — a live snapshot, the building name, the same deep-link URL described above, and Copy Link / Cancel buttons. If a clash is open when you tap Share, the shared text and photo are about that specific clash instead of the general view.
Pick Walk — warehouse / logistics buildings¶
A data-gated pill (only appears when the loaded building carries locator-GUID bins, e.g. a warehouse building like GardenWorld) that walks a picking route over the bins: fly to the next bin in order, scan a bin's QR/type code, and record a signed pick group per bin. Not covered further here — it needs a warehouse-class building loaded to demonstrate, outside this general viewer guide's scope.
FM / Operate lenses — HR_BIM_Asset (ALPHA)¶
The viewer carries one FM / Operate toolbar pill (a building glyph) that opens a wake-aware drawer of
operate-phase lenses — Occupancy (incl. lease status) · Presence · Unit class · Assets / IoT ·
Dashboard. It appears only when the loaded building carries operate data, and each lens is enabled only when
its data exists (else greyed) — no data, no clutter.
→ Full walkthrough (with screenshots): HR / Tenancy / Operate Module guide.
Collaborate on the model — the Teams overlay. One toolbar toggle overlays who-did-what on the building: identity-coloured dots on elements and Find-panel rooms, a history/blame tree, a chat that is the signed log, and dashboard graphs — off by default, pixel-identical until you turn it on. → Teams Overlay guide (with screenshots).
Mobile-only (touch-optimised):
- Site Camera — phone camera with GPS + compass + timestamp overlay
- BIM picture-in-picture — 3D snapshot composited into the photo
- Markup tools — arrow, circle, freehand draw, text annotations
- Share → WhatsApp (with BIM context baked into image)
- GPS Walk Mode — blue dot tracks position in the model
- Wall X-Ray — tap a wall in Walk Mode to see MEP behind it
- Issue log — capture site issues with photo + GPS + classification, export to Excel
Keyboard & Mouse Cheat-Sheet¶
| Key / Gesture | Action |
|---|---|
| Drag | Orbit camera |
| Shift + Drag / Right-click drag | Pan camera |
| Scroll / Pinch | Zoom |
| Click element | Identify — IFC class, name, GUID, storey, material |
| ' (apostrophe) | Toggle Hover Name — hovering (no click) shows the friendly name + room of whatever's under the cursor; also a checkbox in the Find panel. Dead key on some international keyboard layouts (US-International, Spanish, Portuguese, French-Canadian) — fails harmlessly there, use the checkbox instead. |
| Front / Back / Left / Right | Elevation views |
| Roof | Roof plan view |
| Alt+Z | Toggle X-ray mode |
| Alt+C | Film-Maker — derive a cinematic film, edit the flight, record |
| Alt+S | Photographic still — stages the sun/sky/shadow pass, then refines the frozen frame over 16 sub-pixel samples |
| Alt+J | Bounce-light (GI) pass — optional, off by default, not used while recording a film |
| Click the flight tube (in the Film-Maker) | Add a stick — a new band you can drag |
| Ctrl+Z / Ctrl+Shift+Z (in the Film-Maker) | Undo / redo a path edit |
| F11 | Toggle fullscreen |
| F1 | Help — the full, live list of every toolbar action and its shortcut key |
Authoring — editing the structural grid, sketching, extruding — lives in the DAGeVu Modeller, not the Viewer.
Further Reading¶
| Doc | What |
|---|---|
| Kernel-ERP User Guide | iDempiere browser ERP — login → install → POS → reporting · Tenancy |
| DAGeVu Modeller Guide | Author geometry — the editable 3D Grid |
| Clash Detection | Clash detection engine |
| 4D/5D Analysis | nD analytics (4D–8D) |
| Asset Classification & JKR/SKATA | Classification codes, Malaysian handover compliance — what we measure, and what we don't yet certify |
For developers¶
| Doc | What |
|---|---|
| Viewer Component Model | The viewer's 128 JS modules as dependency strata, derived from the call graph — layers, fan-in, and where the scheduling subsystem sits |
Copyright (c) 2025-2026 Redhuan D. Oon. MIT Licensed.